Tuesday 27 August 2013

WiP Wednesday: The one with cutting

Not sure about you, but when things get a little stressy in life, I turn to the cutting mat. Sometimes even stitching two pieces of fabric together is too taxing (dear lord, woe is me, feel free to stop reading now, can you say pity party?!), I just want a rotary cutter in my hand. Seems like pretty cheap therapy to me.

So this week, I hit the mat! First I tackled a Layer Cake of Comma. Besides Fat Quarters, this is the first precut that I have ever bought. Not sure that I will go down this road again, but I will say cutting into a neat stack of already cut squares is pretty sweet! Plans for this delicious stack will be a Road to Tennessee project.

Then I attacked this bright and happy stack, which started it's way in a wee project which I will show you when I am all done. Aren't those deer so cute!

Then under the blade was some Amy Butler and Heather Bailey. These lovelies are the start of Melanie's Postage Stamp Quilt.
And then...because I could not stop myself, I tackled a sweet little stack of Flea Market Fancy. I cut this into 3.5" squares to make Hexies. The Hexies are part of The Library Project. I have a trip coming up in September, so now I have a travel project all ready to go.
Phew! That was a lot of cutting, but in the end I feel better and feeling super motivated with all of these fun projects on the go.

What are you cutting this week?
Adrienne

Linking up today at

Sunday 25 August 2013

The Library Project: The Picks

I am ready to embark on the Library Project! Over the next year I am going to pick six quilts to make from my Modern Quilting Library. Time to use those books that I buy!

The picks are in! Can I tell you that narrowing my library down to six books and six quilts was quite a challenge. But this excuse to pull out all of my books and go through them was awesome! So much inspiration in all of those pages. As you can see here, in my first round there were way more than six!


After much agonizing, here are my picks

First up, Jessica Alexandrakis Quilting on The Go: English Paper Piecing Projects You Can Take Anywhere. This book is just lovely, filled with great instruction on how to EPP. I need a travel and an "in front of the TV" project so this was a good choice. I have not picked a specific finished project, but rather will just start making Hexies and see where it takes me. Obviously this will be a long term-throughout the year project.


Next, that's right, I'm gonna do it - Tula Pink's City Sampler: 100 Modern Quilt Blocks. I love the idea of having a project that I can pick away at over the year. The other thing I like about this books is that I can learn new quilting techniques and build my quilty confidence.


This next pick has been on my shelf for awhile and I think is the book I pick up the most to paw through. It intrigues and frightens me all at the same time. Cherri House City Quilts:12 Dramatic Projects Inspired by Urban Views. Not sure if it is all of the solids, or the graphic modern designs, but I love this book, so I had to include it. And for the pattern I have chose, City Tracks, I already have a fabric bundle ready to go!


The quilt from my next pick is actually going to be for my very own bed! Petal Pod from Missy Shepler's Modern Quilts from the Blogging Universe. I wanted something fairly simple for my bed, and I love the little challenge of some curved piecing.


This next choice was one I knew from the beginning. Denyse Schmidt Modern Quilts: Traditional Inspiration. I love every single quilt in this book, so choosing just one was HARD!

As you can see I want to make more than one project from this one! Maybe a little over-ambitious :). So I am going to save my final choice for when I actually get to the book. Gonna wait to see how I feel at the time. But here are the delicious quilts I will choose from


And for the sixth book, as I already shared, I am choosing Emily Cier's Scrap Republic: 8 Quilt Projects for Those who Love Color. I am actually making my first project from this book. My scraps are sorted and ready for cutting to make the Volume Quilt.


Phew! I am going to be a busy girl this year. But a Happy one! Time to get sewing!

Have you ever embarked on your own Library Project, or would you like to start? Would love to hear about it.
Adrienne

Friday 23 August 2013

Beach Cabins: A Finish

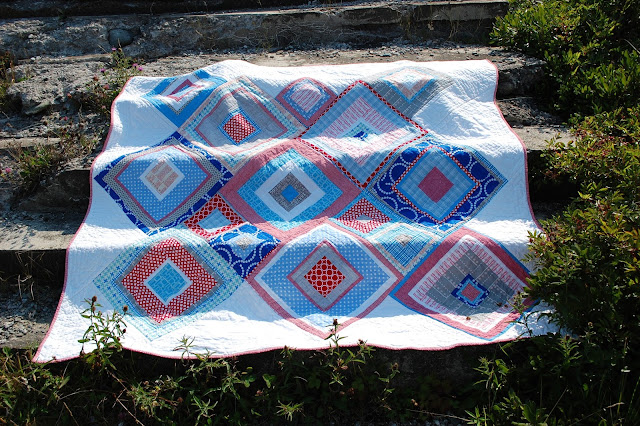
The eagle has landed. Beach Cabins reached it's new home in Ottawa and I have heard that her new family loves her :) So now I can share!


This quilt started with a couple of pieces of blue and red gingham that my client gave me. She wanted something "beachy" and then left me to my own devices. After adding some more reds, blues and grays to the Tilted Cabins Pattern (from From The Blue Chair), Beach Cabins was born, and if I do say so myself, I think this quilt fits the "Beachy" bill. So of course I took it to the beach for it's photo shoot.


This project marked the first time that I used the Quilt As You Go method of quilting, so I talked about it a lot! You can read the previous posts here and here. When this baby came out of the dryer all crinkly and soft I was so happy! 


I am not going to say how long it has been since I had a finish (so embarrassing), but it is all worth it to have one like this!

Linking up here because I actually have something to show for myself!


Happy weekend! I don't know what you will be doing, but I have big plans to work on the next finish!
Adrienne

Previous Posts related to this quilt:
Post 1
Post 2
Post 3

Thursday 22 August 2013

100 Quilts for Kids

I am very excited to share with you that I am going to be participating in the Swim Bike Quilt 100 Quilts For Kids (press the button, it's magic!)

 
Lately I have been thinking that I need to share my quilty love outside of my house / family / friends. When I saw 100 Quilts for Kids popping up in the Blogging universe, I knew that now was the time. The deadline is September 30th so I have time yet to get a quilt (or maybe two!) in.
 
I am not sure what I am going to make yet, but I have decided that my finished quilt(s) will be donated to Phoenix.

 
From their website "Phoenix is a non-profit, community based organization located in Halifax. We offer at-risk and homeless youth (ages 12 – 24) the opportunity to break the cycle of homelessness and find a better path. Our services are free of charge to any youth who reaches out to us – we don’t require adult permission. Phoenix prides itself on being 100% non-judgemental and welcomes people from all cultures and walks of life. We offer a wide range of programs and services including: prevention, crisis assistance, emergency and long-term shelter, employment and learning assistance, counselling, parent support, food, laundry, medical support and more."
 
I think youth involved with Phoenix would love a quilt to cuddle in as they brave their new paths. I have a big weekend of sewing ahead!
 
Do you quilt for Charity? Would love to hear all about it.
Adrienne

Monday 19 August 2013

Quilting As I Go: Part Deux

Couple of weeks ago I started showing you how I was using the QAYG process on the Crooked Cabins quilt (here is the link to that post). In that post I got as far as step one, quilting the blocks. I promised to show you the next steps, so here we are.

First you start with your delicious pile of quilted blocks.


Following your top layout, start sewing your quilted blocks together. Right sides together and sew with a 1/2" seam allowance.


This of course is more than our regular 1/4", but you need a little extra room so that you can iron the seams flat open to help reduce bulk.  

Trimming the ends of each seam is also important too help cut down on bulk as you join multiple blocks together.


Continue to join all of your blocks until you your top is complete. You wind up with a fully quilted quilt top with a back that looks like this.
Following your favorite technique, baste your quilted top to the backing fabric. I typically pin baste, but on this particular night I was feeling all frisky and pulled out the spray baste. Wild I know. But it worked!


If you do pin baste you should think ahead about where the next quilting lines will fall because the next step is to attach the top to the back by quilting in the ditch between the quilted blocks.


So not all of your quilting will shown on the back, but you will see the block outlines.


Once your quilting in the ditch is all done, square up your top and bind, again using your fave method. And your quilt is done!! Of course a nice picture of my finished quilt would be good at this point right? Sure would, and it has actually been off on location for it's photo shoot. But this quilt is going in the mail to it's new owner, so want to save the reveal until it is in their hot little hands. UPDATE - The quilt has landed, so you can click here to see the finished quilt :)

So, that is QYAG. I really liked the process and for sure will be doing it again. A couple of things I learned trying this process:
1. If you are following a pattern, make sure to take into account the 1/2" seam allowance you are going to need to sew your finished blocks together. I did not do this. Overall it did not affect the pattern, but the finished size quilt ended up being a mite smaller :)


2. This method of quilting is great for a "plain even-sized blocks sewn together in a column" quilt top. if it is anything else, you need to do some pre-planning.

Take my project as an example, I had various sized log cabins and negative space in the pattern. The Log cabins blocks were fine, I quilted those by echoing the shape of the cabins in the quilting. But then when I got to the negative space I had to treat each area of the negative space like a stand alone block as well. In terms of how to quilt those individual pieces, this took some thought. At first I was all like "I will quilt log cabins in the white spaces to echo the log cabin blocks". Sure, this is a good idea, but a lot of the pieces were triangles, and quilting squares in them ended up looking ridiculous. So after some quality time with my seam ripper. I decided to just mirror each shape with the quilting.


I cannot say that I was 100% happy with my solution, but after it was all washed and fluffy, I quite like the result.

3. Light backing fabric is not the friend of QYAG. Why you ask ? The seams show through!


You see the issue I ran into after I had pieced a lovely back? After a quick consult with a quilty friend who quashed my "But it adds more texture to the back", I found a darker colored fabric, re basted, and quilted in the ditch. The seams are now hidden, and all you see is the stitch in the ditch quilting lines.

So, have you tried this method, or is it on your "to try" list? Would love to hear anything you have learned about this process.

Stay tuned for the finished quilt :)
Adrienne

Linking up this week at